Cucumber Java 如何与 Spring Boot 进行集成?
前面我们在「如何使用 Cucumber Java 进行 UI 测试?」一文中,以登录 GitHub 并在页面创建 Issue 为例介绍了 Cucumber 与 Selenium 的集成,但其中的示例工程未使用依赖注入工具,所有对象的新建均是使用原生 new 关键字来实现的。接着,我们在上文「如何在 Cucumber Java 中使用 PicoContainer 进行依赖注入?」介绍了在 Cucumber 中使用 PicoContainer 进行依赖注入的方法。尽管 PicoContainer 比较轻量,也是 Cucumber 官方推荐的依赖注入工具,但在 Java 技术栈,Spring 或 Spring Boot 框架才是主流,除了提供依赖注入功能外,其还提供诸多其它实用功能(如灵活的配置、方便的数据库连接、易用的组件集成方法等),所以探索 Cucumber 与 Spring Boot 的集成很有必要。本文即接着前面的两篇文章,同样以登录 GitHub 并在页面创建 Issue 为测试场景,以示例工程的方式演示 Cucumber 与 Spring Boot 的集成,示例工程实现语言为 Java,使用的浏览器测试工具为 Selenium,工程使用 Maven 管理。
开始前,让我们列出该示例工程所使用的 JDK、Maven、Spring Boot 与 Cucumber 的版本:
JDK:BellSoft Liberica 17.0.7
Maven:3.9.2
Spring Boot:3.3.0
Cucumber Java:7.18.0
1 工程结构与 Maven 依赖
该测试工程的结构如下:
cucumber-spring-boot-integration-demo
├─ src/test
│   ├─ java
│   │    └─ com.example.tests
│   │       ├─ conf
│   │       │   ├─ ApplicationConf.java
│   │       │   ├─ WebDriverBean.java
│   │       │   └─ CucumberSpringIntegrationTest.java
│   │       ├─ stepdefs
│   │       │   ├─ LoginStep.java
│   │       │   └─ CreateIssueStep.java
│   │       ├─ pages
│   │       │   ├─ LoginPage.java
│   │       │   └─ CreateIssuePage.java
│   │       ├─ utils
│   │       │   └─ GoogleAuthenticatorUtil.java
│   │       ├─ hooks
│   │       │   └─ ScreenshotHook.java
│   │       ├─ DummyApplication.java
│   │       └─ TestRunner.java
│   └─ resources
│       ├─ features
│       │   └─ github-issues.feature
│       └─ application.yaml
└─ pom.xml
下面简述一下各个包、类及文件夹的作用:
conf 包用于放置各种配置类;stepdefs 包用于放置 Cucumber 特性描述文件的实现,这些实现称作 Step Definition 类;pages 包用于放置页面对象类,负责支撑 stepdefs 中的各个 Step;utils 包用于放置 Java 工具类,用于 GitHub 登录的双因子验证码获取工具类即位于此;hooks 包用于放置各种 Cucumber 钩子,钩子可以在场景(Scenario)执行前后或场景中的 Step 执行前后加入一些额外的逻辑,为场景中的每个步骤执行后进行页面截图的钩子即位于此;DummyApplication.java 类为一个空的 Spring Boot 工程启动类;TestRunner.java 为测试用例执行入口;resources/features 文件夹用于放置 Cucumber 特性描述文件;resources/application.yaml 为工程的配置文件。
该测试工程是一个 Spring Boot 工程,需要引入如下 Parent:
<parent>
    <groupId>org.springframework.boot</groupId>
    <artifactId>spring-boot-starter-parent</artifactId>
    <version>3.3.0</version>
    <relativePath/>
</parent>
用到的依赖如下:
<dependencies>
    <!-- spring boot -->
    <dependency>
        <groupId>org.springframework.boot</groupId>
        <artifactId>spring-boot-starter-web</artifactId>
        <scope>test</scope>
    </dependency>
    <dependency>
        <groupId>org.springframework.boot</groupId>
        <artifactId>spring-boot-starter-test</artifactId>
        <scope>test</scope>
    </dependency>

    <!-- cucumber -->
    <dependency>
        <groupId>io.cucumber</groupId>
        <artifactId>cucumber-java</artifactId>
        <version>${cucumber.version}</version>
        <scope>test</scope>
    </dependency>
    <dependency>
        <groupId>io.cucumber</groupId>
        <artifactId>cucumber-junit</artifactId>
        <version>${cucumber.version}</version>
        <scope>test</scope>
    </dependency>
    <dependency>
        <groupId>io.cucumber</groupId>
        <artifactId>cucumber-spring</artifactId>
        <version>${cucumber.version}</version>
        <scope>test</scope>
    </dependency>

    <!-- selenium -->
    <dependency>
        <groupId>org.seleniumhq.selenium</groupId>
        <artifactId>selenium-java</artifactId>
        <version>${selenium.version}</version>
        <scope>test</scope>
    </dependency>

    <!-- google authenticator -->
    <dependency>
        <groupId>com.warrenstrange</groupId>
        <artifactId>googleauth</artifactId>
        <version>1.5.0</version>
        <scope>test</scope>
    </dependency>

    <!-- lombok -->
    <dependency>
        <groupId>org.projectlombok</groupId>
        <artifactId>lombok</artifactId>
        <version>1.18.32</version>
        <scope>provided</scope>
    </dependency>

    <!-- junit vintage -->
    <dependency>
        <groupId>org.junit.vintage</groupId>
        <artifactId>junit-vintage-engine</artifactId>
        <version>${junit-vintage.version}</version>
        <scope>test</scope>
    </dependency>
</dependencies>
可以看到,该工程主要依赖了 Spring Boot、Cucumber 与 Selenium。
此外,还依赖一个生成 HTML 报告的插件 maven-cucumber-reporting:
<plugin>
    <groupId>net.masterthought</groupId>
    <artifactId>maven-cucumber-reporting</artifactId>
    <version>5.8.1</version>
</plugin>
介绍完工程的整体结构与 Maven 依赖,下面就一一介绍下该工程的 Cucumber 特性文件、包和类。
2 Cucumber 特性文件
Cucumber 特性文件 github-issues.feature 的内容如下:
Feature: GitHub Issues UI 测试

  Scenario: 新增一个 Issue
    Given 登录到 GitHub
    When 打开 Issues 页面并新增一个标题为 "Cucumber UI Test" 的 Issue
    Then Issue 新增成功且标题为 "Cucumber UI Test"
可以看到,其使用 Gherkin 语言描述了如何在 GitHub 新增一个 Issue。
3 conf 包
我们将配置相关的类都置于该包下。
欲将 Cucumber 与 Spring Boot 集成,则每个 Step Definition 类须看作是一个可以单独运行的 Spring Boot 测试类,需要使用 @SpringBootTest 注解修饰。本文设置了一个 @SpringBootTest 父类 CucumberSpringIntegrationTest.java,所有 Step Definition 类继承该类即可。
CucumberSpringIntegrationTest.java 的内容如下:
// src/test/java/com/example/tests/conf/CucumberSpringIntegrationTest.java
package com.example.tests.conf;

import com.example.tests.DummyApplication;
import io.cucumber.spring.CucumberContextConfiguration;
import org.springframework.boot.test.context.SpringBootTest;

@CucumberContextConfiguration
@SpringBootTest(classes = DummyApplication.class)
public class CucumberSpringIntegrationTest {
}
集成了 Spring 框架后,所有 Bean 已交由 Spring 容器管理。因此,Selenium WebDriver 的实例化也变得非常简单,只要设置一个配置类,将对应的实例获取方法标记 @Bean 注解即可。
WebDriverBean.java 即负责 WebDriver 实例的获取,其内容如下:
// src/test/java/com/example/tests/conf/WebDriverBean.java
package com.example.tests.conf;

import org.openqa.selenium.WebDriver;
import org.openqa.selenium.chrome.ChromeDriver;
import org.springframework.context.annotation.Bean;
import org.springframework.context.annotation.Configuration;

@Configuration
public class WebDriverBean {
    @Bean
    public WebDriver webDriver() {
        return new ChromeDriver();
    }
}
使用了 Spring Boot 后,文件的读取也变得异常简单,无须再自行进行文件读取与解析,只需使用对应的注解即可。
ApplicationConf.java 即用于读取 application.yaml 配置文件中的各个变量,其内容如下:
// src/test/java/com/example/tests/conf/ApplicationConf.java
package com.example.tests.conf;

import lombok.Getter;
import org.springframework.beans.factory.annotation.Value;
import org.springframework.context.annotation.Configuration;

@Getter
@Configuration
public class ApplicationConf {
    @Value("${github.repo}")
    private String githubRepo;
    @Value("${github.username}")
    private String githubUsername;
    @Value("${github.password}")
    private String githubPassword;
    @Value("${github.totp-secret}")
    private String githubTotpSecret;
}
4 stepdefs 包
Selenium 特性文件对应的 Step Definition 实现类均位于该包下。
对应特性文件 Given 步骤,用于 GitHub 登录的实现类 LoginStep.java 的内容如下:
// src/test/java/com/example/tests/stepdefs/LoginStep.java
package com.example.tests.stepdefs;

import com.example.tests.conf.CucumberSpringIntegrationTest;
import com.example.tests.pages.LoginPage;
import io.cucumber.java.en.Given;
import org.springframework.beans.factory.annotation.Autowired;

public class LoginStep extends CucumberSpringIntegrationTest {
    @Autowired
    private LoginPage loginPage;

    @Given("登录到 GitHub")
    public void login() {
        loginPage.login();
    }
}
可以看到,其继承了上面定义的 CucumberSpringIntegrationTest 父类,并且使用 @Autowired 注解注入了 LoginPage 依赖,并调用了 LoginPage 的 login() 方法。
对应特性文件 When 与 Then 步骤,用于打开页面、新增 Issue 与校验 Issue 标题的实现类 CreateIssueStep 的内容如下:
// src/test/java/com/example/tests/stepdefs/CreateIssueStep.java
package com.example.tests.stepdefs;

import com.example.tests.conf.CucumberSpringIntegrationTest;
import com.example.tests.pages.CreateIssuePage;
import io.cucumber.java.en.Then;
import io.cucumber.java.en.When;
import org.springframework.beans.factory.annotation.Autowired;

import static org.hamcrest.CoreMatchers.startsWith;
import static org.hamcrest.MatcherAssert.assertThat;

public class CreateIssueStep extends CucumberSpringIntegrationTest {
    @Autowired
    private CreateIssuePage issuesPage;

    @When("打开 Issues 页面并新增一个标题为 {string} 的 Issue")
    public void createIssue(String title) {
        // create issue
        issuesPage.createIssue(title);
    }

    @Then("Issue 新增成功且标题为 {string}")
    public void checkTitle(String title) {
        assertThat(issuesPage.getTitle(), startsWith(title));
    }
}
其同样继承了 CucumberSpringIntegrationTest 父类,并且使用 @Autowired 注解注入了 CreateIssuePage 依赖。
5 pages 包
该包用于放置页面对象类,页面对象类拥有页面的元素与行为,页面元素被定义为了属性,页面行为被定义为了方法。
对应 GitHub 登录页面的 LoginPage 的内容如下:
// src/test/java/com/example/tests/pages/LoginPage.java
package com.example.tests.pages;

import com.example.tests.conf.ApplicationConf;
import com.example.tests.utils.GoogleAuthenticatorUtil;
import org.openqa.selenium.By;
import org.openqa.selenium.WebDriver;
import org.springframework.beans.factory.annotation.Autowired;
import org.springframework.stereotype.Component;

@Component
public class LoginPage {
    private static final String LOGIN_URL = "https://github.com/login";

    private static final By USERNAME_ELEM = By.xpath("//input[@name='login']");
    private static final By PASSWORD_ELEM = By.xpath("//input[@name='password']");
    private static final By SIGN_IN_BUTTON = By.xpath("//input[@name='commit']");
    private static final By TOTP_ELEM = By.xpath("//input[@name='app_otp']");

    @Autowired
    private ApplicationConf applicationConf;
    @Autowired
    private WebDriver driver;

    public void login() {
        // open login url
        driver.get(LOGIN_URL);

        // input username & password
        driver.findElement(USERNAME_ELEM).sendKeys(applicationConf.getGithubUsername());
        driver.findElement(PASSWORD_ELEM).sendKeys(applicationConf.getGithubPassword());

        // click "Sign in" button
        driver.findElement(SIGN_IN_BUTTON).click();

        // input Authentication code
        int code = GoogleAuthenticatorUtil.getTotpCode(applicationConf.getGithubTotpSecret());
        driver.findElement(TOTP_ELEM).sendKeys("" + code);
    }
}
可以看到,其使用了 @Component 注解将其实例化交给了 Spring 容器,并使用 @Autowired 注解引入了所需的依赖。
对应 Issue 创建页面的 CreateIssuePage 的内容如下:
// src/test/java/com/example/tests/pages/CreateIssuePage.java
package com.example.tests.pages;

import com.example.tests.conf.ApplicationConf;
import org.openqa.selenium.By;
import org.openqa.selenium.WebDriver;
import org.openqa.selenium.support.ui.ExpectedConditions;
import org.openqa.selenium.support.ui.WebDriverWait;
import org.springframework.beans.factory.annotation.Autowired;
import org.springframework.stereotype.Component;

import java.time.Duration;

@Component
public class CreateIssuePage {
    private static final String CREATE_ISSUE_URL = "/issues/new";

    private static final By INPUT_TITLE_ELEM = By.xpath("//input[@id='issue_title']");
    private static final By SUBMIT_BUTTON = By.xpath("//button[contains(text(), 'Submit new issue')]");

    @Autowired
    private ApplicationConf applicationConf;
    @Autowired
    private WebDriver driver;

    public void createIssue(String title) {
        // open issue creation URL
        driver.get(applicationConf.getGithubRepo() + CREATE_ISSUE_URL);

        new WebDriverWait(driver, Duration.ofMinutes(1)).until(ExpectedConditions.visibilityOfElementLocated(INPUT_TITLE_ELEM));

        // input title
        driver.findElement(INPUT_TITLE_ELEM).sendKeys(title);

        // submit
        driver.findElement(SUBMIT_BUTTON).click();
    }

    public String getTitle() {
        return driver.getTitle();
    }
}
其同样使用了 @Component 注解与 @Autowired 注解。
至此,我们已将该测试工程主要的包及其下的文件作了介绍,其它诸如 hooks 与 utils 包,分别负责管理 Cucumber 钩子与 Java 工具类。我们分别在这两个包下放置了一个用于每个步骤执行后的页面截图钩子与 Google Authentication 验证码生成工具类,想看这两个类源码的同学可以参考文末提供的链接自行查看,这里就不再赘述了。
6 DummyApplication 类
因该工程是一个 Spring Boot 工程,其启动需要依赖一个入口类。
为此,我们添加了一个空的启动类 DummyApplication.java,其内容如下:
// src/test/java/com/example/tests/DummyApplication.java
package com.example.tests;

import org.springframework.boot.SpringApplication;
import org.springframework.boot.autoconfigure.SpringBootApplication;

@SpringBootApplication
public class DummyApplication {
    public static void main(String[] args) {
        SpringApplication.run(DummyApplication.class, args);
    }
}
7 TestRunner 类
Cucumber 测试用例执行入口类 TestRunner.java 的内容如下:
// src/test/java/com/example/tests/TestRunner.java
package com.example.tests;

import io.cucumber.junit.Cucumber;
import io.cucumber.junit.CucumberOptions;
import org.junit.runner.RunWith;

@RunWith(Cucumber.class)
@CucumberOptions(
        features = "src/test/resources/features",
        plugin = {"json:target/cucumber.json"}
)
public class TestRunner {
}
其指定了运行方式、特性文件位置与 JSON 报告位置。
8 工程运行与报告展示
若您使用 IntelliJ IDEA 编辑器打开的该测试工程,则直接在 TestRunner.java 文件点击右键进行 DEBUG 即可,其运行效果如下:

浏览器自动化测试效果与前文「如何使用 Cucumber Java 进行 UI 测试?」中示例工程的运行效果无异:
若使用的是命令行,则使用如下 Maven 命令运行即可:
mvn clean verify
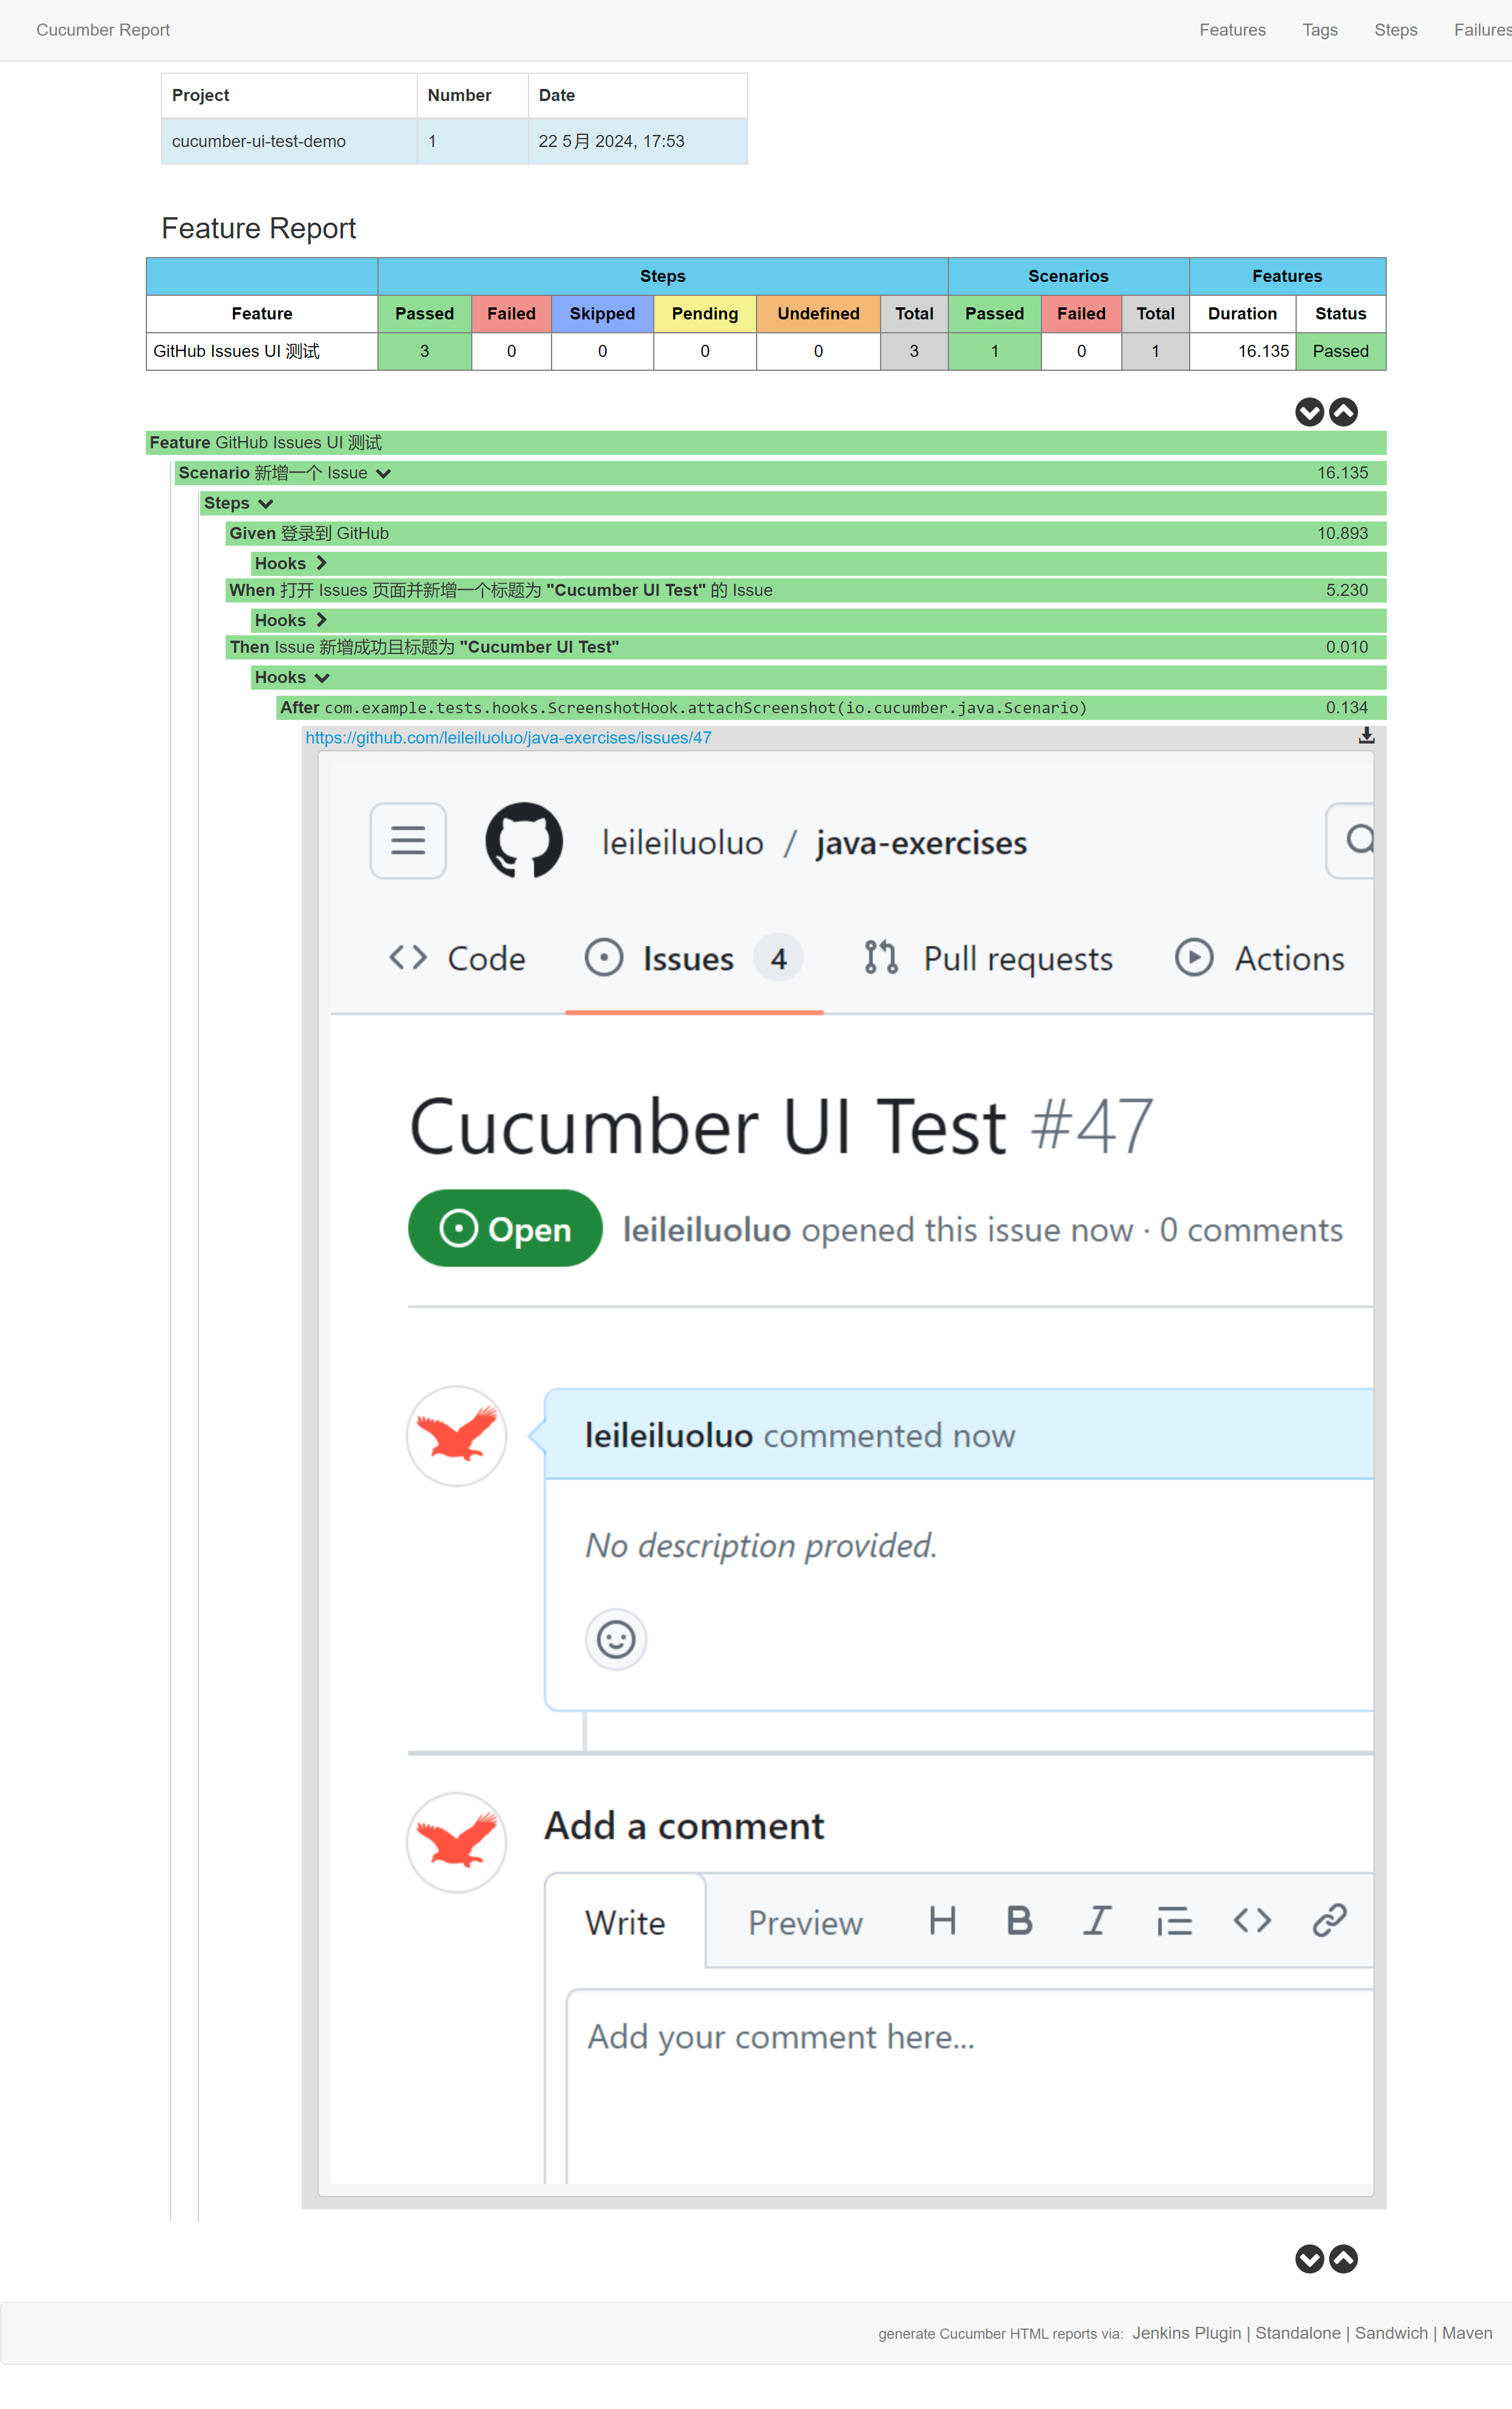
运行完成后,会在 target/cucumer-report-html 文件夹下生成 HTML 报告,打开后的效果如下:
9 小结
本文以登录 GitHub 并在页面创建 Issue 为测试场景,以示例工程的方式演示了 Cucumber 与 Spring Boot 的集成。完整测试工程已提交至本人 GitHub,欢迎关注或 Fork。
参考资料
[1] GitHub: Cucumber Spring Sample Project - https://github.com/cucumber/cucumber-jvm/tree/main/cucumber-spring
[2] 磊磊落落:如何使用 Cucumber Java 进行 UI 测试? - https://leileiluoluo.com/posts/how-to-perform-ui-testing-using-cucumber.html
[3] Medium: Integrating Cucumber into a Spring Boot Project - https://medium.com/@francislainy.campos/integrating-cucumber-into-a-spring-boot-project-a-step-by-step-guide-f899c04bf81f
[4] Baeldung: Cucumber Spring Integration - https://www.baeldung.com/cucumber-spring-integration

相关文章
评论
 正在加载评论......